


Time-Lapse Documentation of a Steel Warehouse: Technical Lessons from 101 Days of Construction

Time-Lapse Documentation of a Steel Warehouse: Technical Lessons from 101 Days of Construction
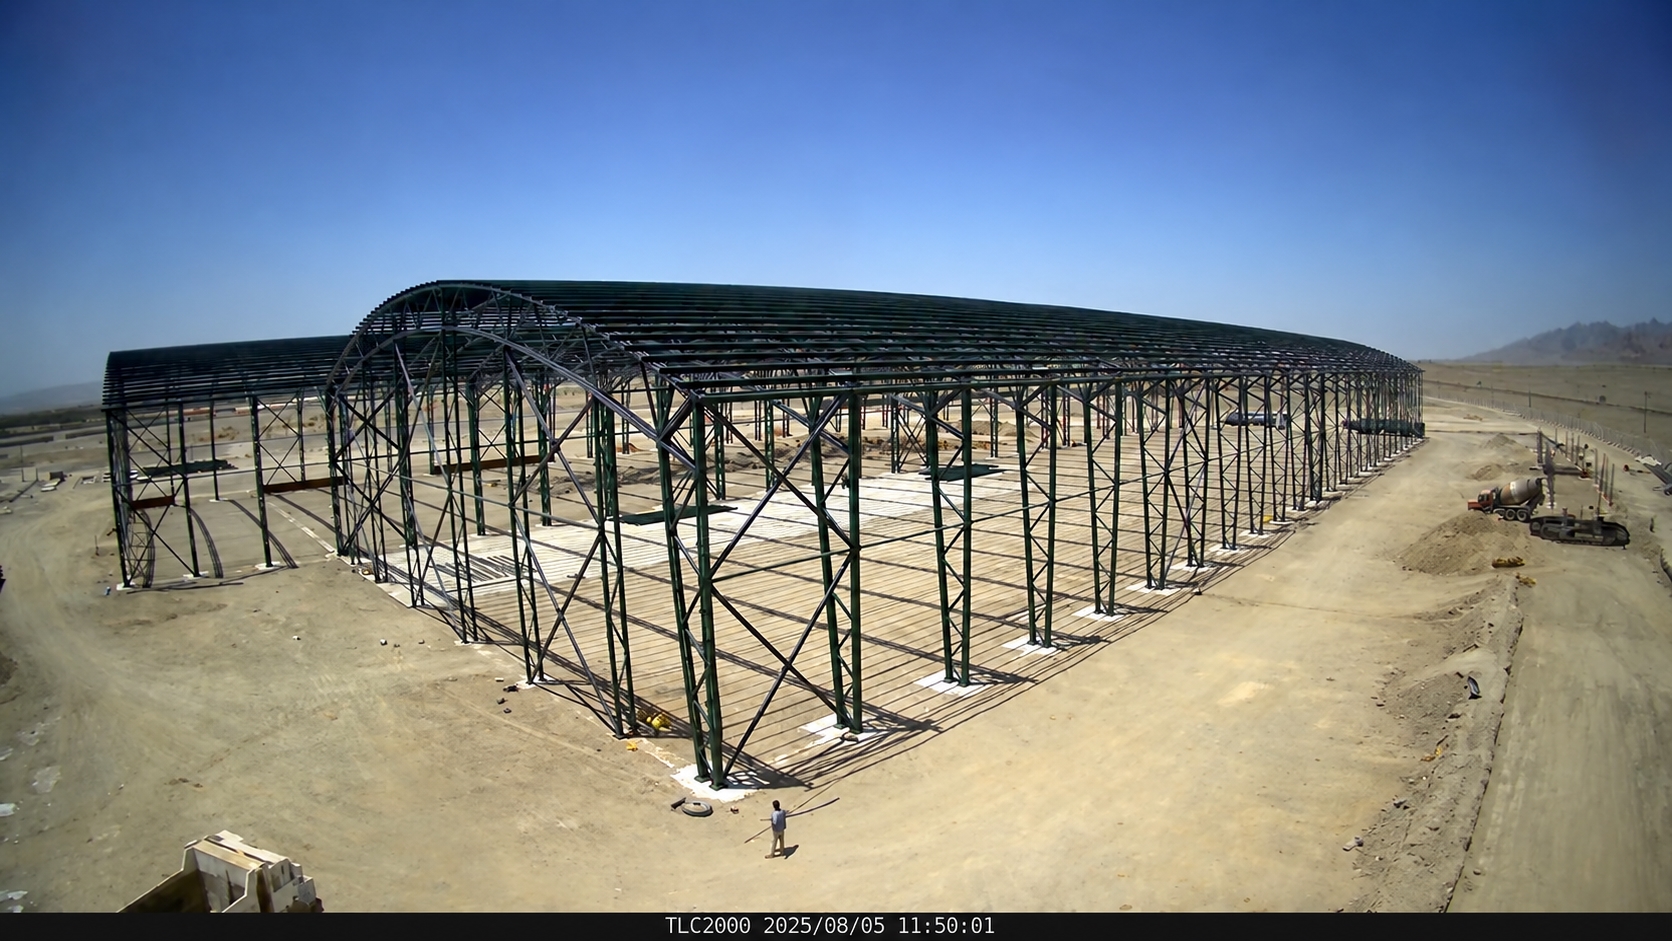
A single wide-angle view captures the gradual assembly of a steel warehouse structure over approximately 101 days. This case study examines how capture interval, camera placement and mounting stability influence the final time-lapse footage.
Project at a Glance
- Construction phase documented: Progress of the steel warehouse frame between 28 April and 7 August 2025.
- Capture approach: Elevated camera position, one image every 10 minutes during working hours (according to project information).
- Video output: 1920 × 1080 pixels in 16:9 format, approximately 2 minutes 2.9 seconds at 30 fps.
- Key technical lesson: A stable mounting pole and secure connections matter just as much as framing and capture interval.
The overall construction project reportedly lasted approximately one year. The footage examined here covers only about three months; it should not be presented as a complete record of the entire build.
From Steel Components on the Ground to a Warehouse Frame
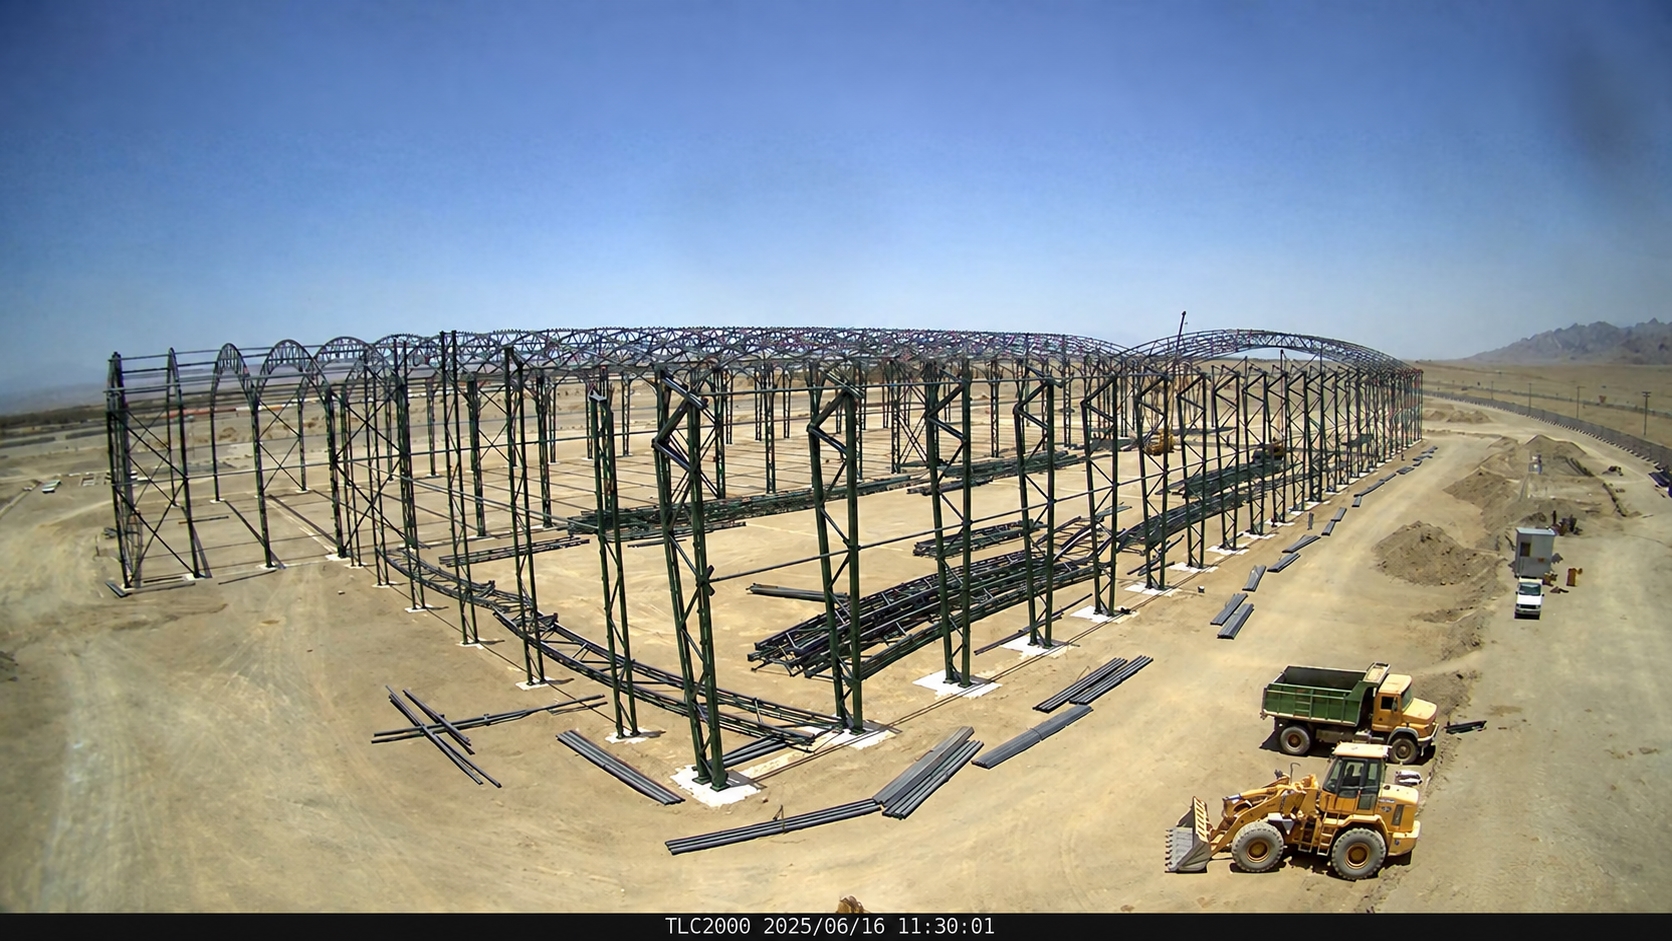
In the earliest footage, dated 28 April, structural steel components are still laid out on the ground and the supporting columns have not yet been erected. By 2 May, rows of columns are taking shape as cranes and trucks operate on site. Toward the end of May, the first curved roof frames become visible at one end of the building. Throughout June and July, these frames gradually extend along the warehouse.
Because the viewpoint remains consistent, changes in the structure can be compared across dates. What begins as an area used to store materials becomes a substantial steel frame with clearly visible arched roof members. The footage does not, however, show the final roof and wall cladding or the handover of the completed project.
Site Conditions: Daylight, Dust and Field of View
The site is located in open, arid terrain. Changes in sunlight and shadow can be seen between morning and afternoon. On some days, including around 7 May, airborne dust and haze reduce image contrast. The reviewed footage contains recordings from approximately 6:50 a.m. to 4:00 p.m. The wide-angle view captures much of the site, although some perspective and lens distortion is visible toward the edges of the frame.
Why Was the Camera Installed at an Elevated Position?
The objective was not to film one construction activity in close-up, but to document the overall progress of the warehouse frame in its wider setting. An elevated viewpoint made it possible to include the construction area, stored materials and vehicle movements in the same frame. The horizontal 16:9 composition also suited the building's elongated shape.
The trade-off is that smaller assembly details become harder to distinguish from a distance. If the goal were to document connections, welding or a specific installation activity, a second camera placed lower and closer to the work could provide a complementary view. Camera positions and the number of cameras should be determined by the documentation objectives before recording begins.
What Does a 10-Minute Capture Interval Show?
At a 10-minute interval, the camera theoretically captures six images per hour of active recording. Since meaningful changes in structural steel assembly generally unfold over hours or days, this interval can be effective for condensing long-term progress into a short video.
Short activities that begin and end between captures may not appear at all. Time-lapse is therefore useful for progress documentation and visual reporting, but it is not a substitute for continuous security footage or detailed operational video. The capture interval is the time between photographs; frame rate (fps) is the number of frames displayed per second in the finished video.
Project and Capture Details
| FEATURE | DESCRIPTION |
|---|---|
| Project type | Steel-frame warehouse construction |
| Approximate overall project duration | Approximately one year |
| Documentation period | 28 April 2025 at 12:48 – 7 August 2025 at 08:40; approximately 101 days |
| Camera system | BCC2000 equipped with a TLC2000 camera |
| Mounting height | Approximately 20 metres |
| Capture interval | One image every 10 minutes during working hours |
| Viewpoint | Elevated wide view of the structure and surrounding construction site |
| Output format | 16:9 aspect ratio, 1920 × 1080 pixels |
| Video duration and frame rate | 2 minutes 2.9 seconds at 30 frames per second |
| On-screen information | Date and time strip with the TLC2000 prefix, Trivion Tek logo, and BCC2000 product graphic |
| Site conditions | Open desert terrain; dust and fog on some days |
| Lens | Very wide-angle view with distortion at the edges of the frame |
| Installation challenge | Insufficient mounting pole stability and camera shake, particularly toward the end of the footage |
Date and Time Information on Each Frame
The date and time overlay at the bottom of the footage links each stage of construction to its recorded time. For long-running projects, this can help reviewers identify when a particular assembly stage occurred. However, timestamp accuracy depends on the camera's clock, so the date, time and relevant display settings should be checked before recording begins.
A Practical Lesson from the Site: What Happens When the Mount Is Not Stable?
According to information provided from the site, the mounting pole was not sufficiently rigid, resulting in camera shake and shifts in framing, particularly toward the end of the recording period. In time-lapse footage, even small changes in camera position between images can become conspicuous jumps during accelerated playback. The footage was subsequently worked on to produce a revised video; the effect of any stabilisation should be assessed by comparing the original and edited versions.
Checklist Before a Long-Term Time-Lapse Recording
- Check that the pole, mounting hardware and fasteners are sufficiently stable under wind and vibration.
- Secure the camera's orientation and inspect any connections that could loosen.
- Run a short trial recording over several days and check consecutive images for framing shifts.
- Verify the camera's date and time.
- Plan periodic checks of the protective housing, lens, power supply and file backups
The TLC2000 Used on Site—and the BCC2000 as an Alternative
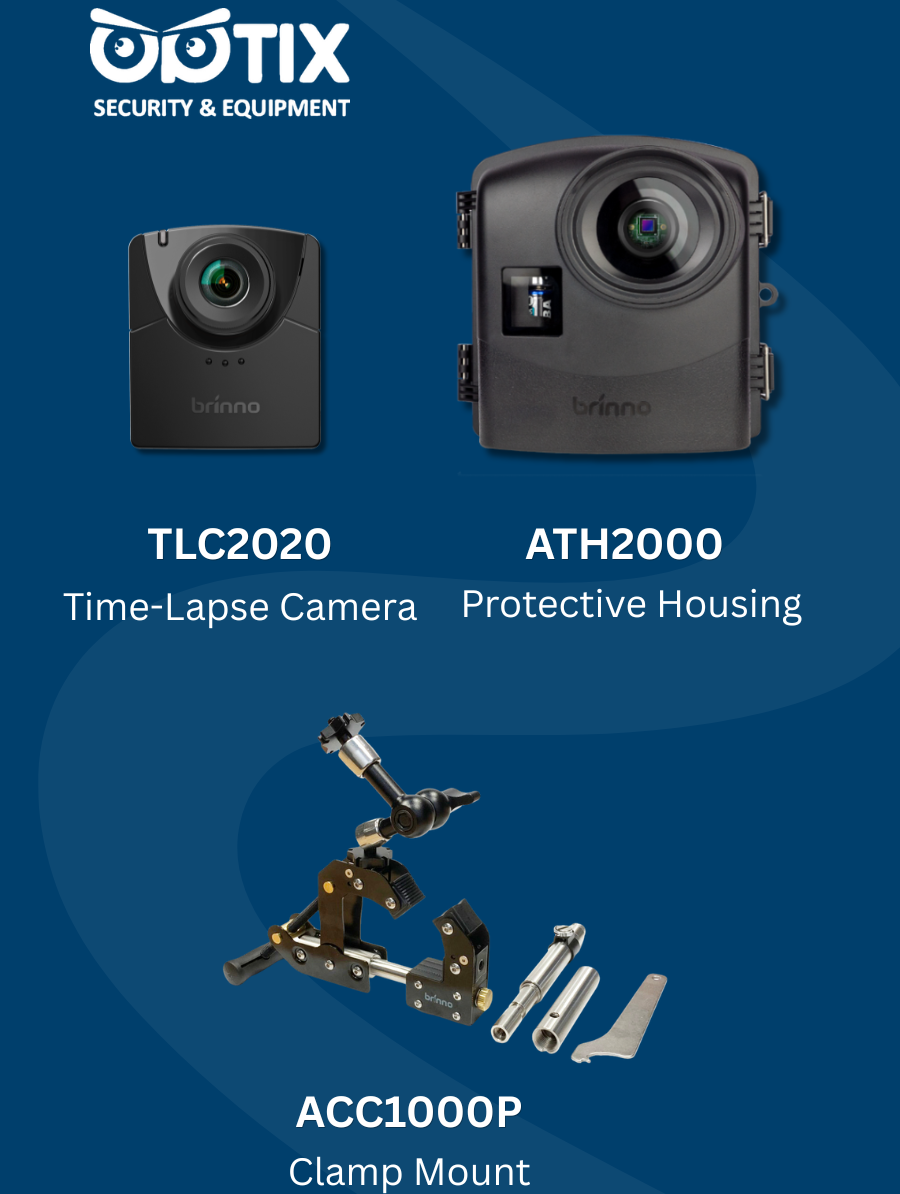
The BCC2000 is a time-lapse kit comprising the
TLC2020 camera, ATH2000 protective housing and
ACC1000P mounting clamp. This project illustrates the
importance of choosing a viewpoint that covers the
wider
site, setting an interval that matches the pace of
construction and keeping the camera securely fixed
throughout the recording period.
Image settings such as exposure and white balance also
matter in this type of recording. The footage alone,
however, does not establish the exact settings or
focusing
method used for this project.
What the Video Shows
About the footage: The camera identified in the project video is the TLC2000. The BCC2000 is a different kit containing the TLC2020; this video is not presented as footage recorded with a BCC2000. The camera was installed at an elevated position and, according to project information, used a 10-minute capture interval. Each frame includes a date and time overlay along the bottom.
Sequence of events: On 28 April, steel components are visible on the ground. Columns rise over the following days; dusty conditions affect visibility around 7 May. The first curved roof frames appear toward the end of May. By early August, the footage shows a steel structure with most of its roof framing in place.
Contact Us to Choose the Right Time-Lapse Camera for Your Project
Every construction project has different timelines, site conditions, filming objectives, and budgets. Choosing the right time-lapse camera, setting the capture interval, planning the camera position, and selecting a suitable power supply help ensure consistent project documentation. For elevated installations, a stable mount and secure connections are also essential for clear, steady footage.
At Optix, we help you select the Brinno time-lapse camera and accessories that suit your project’s technical requirements and budget. We also answer your technical questions about installation and operation.
For more information on what to consider when choosing a camera, explore our Guide to Choosing the Right Time-Lapse Camera for Your Project.
Tell us about your project so we can help you evaluate camera models, mounting accessories, and power options.
Email: info@optixllc.ae
Phone: +971 50 464 3542
WhatsApp: +971 50 521 4320
WhatsApp: +971 50 246 1247
WhatsApp: +971 50 374 9386
Address: No. US-036, S2 Fl, Burjuman Business Tower, Bin Zayed Rd, Al Mankhool, Dubai, UAE.